A walkthrough for ThreatDetect clients: how to set up BloodHound for Active Directory visualisation
This page details how ThreatDetect customers can set up BloodHound to gather the necessary data needed to help keep an eye on their organisation’s Active Directory.
What is BloodHound and how does it relate to an AD?
Hackers, pen testers and red teamers commonly use a tool called BloodHound to visually map a compromised organisation’ Active Directory (AD).
An AD is the source of information that describes a company’s structure in a Microsoft Windows environment. It consists of objects and displays where these objects sit in relation to each other within the environment. The relationships between objects are called the ‘paths’. The AD consists of:
- users
- roles they may have (for example database administrators)
- computers
- administration policies that describe how to manage objects
- a host of other information (for example who can access what)
To attackers, being able to interrogate AD is extremely useful for identifying which objects are worth targeting in an organisation. Any person with a valid company Windows domain account can interrogate their company’s AD. The AD itself resides on the company’s Windows domain controllers.
Typically, a low privilege user or service account for an exposed service is compromised during the initial stages of an attack. This is the initial foothold. Bloodhound can be used by people with that foothold to find a path to other resources.
If you have a large number of objects (typically when the company is medium to large in size), the number of paths between the objects grows exponentially. This inevitably leads to a rapid increase in complexity, which makes it difficult to manage the Windows domain. These complications often result in unknown security weaknesses. For instance, complexity may allow a low privilege user access to a sensitive role or server holding high value data.
An attacker is typically only interested in finding the easiest path from their initial access point to the desired target object. These paths are usually those that provide attackers with a route to compromise a domain administrator.
Attackers do not want to manually search every path required to reach their desired target. Bloodhound is designed to quickly return the information required to identify privilege escalation weaknesses in active directories.
Using BloodHound Defensively
As a Managed Detection and Response provider, with a focus on offensive security integration, we stay up to date with the latest hacking tools being used and use them ourselves to improve the overall quality of the service.
BloodHound can be leveraged to track paths of compromise, identify rogue administrator users, and detect privilege escalation. Just as visualising attack paths is incredibly useful for an attacker to work out routes to high value targets, it is just as valuable for us to visualise your AD environment to view the same paths and provide advice to prevent such attacks.
BloodHound can achieve this by showing previously unknown or hidden administrator users, or high privilege roles that have access to sensitive assets such as domain controllers, mail servers, databases or other high value targets. These accounts may not belong to typically privileged AD groups (i.e. Domain Admins/Enterprise Admins), but they may still have access to the same systems. The permissions for these accounts are directly assigned using access control lists (ACL) on AD objects.
Service, deployment and maintenance accounts that perform automated tasks in your environment or network are an attractive target for attackers, who can leverage these ‘non-user’ accounts for both lateral movement and gaining access to multiple systems. Exploitation of these privileges allows malware to easily spread throughout an organisation.
In addition, (and of most use to us as your Managed Detection and Response provider), BloodHound provides context around identified events. By asking our clients to send us the information that BloodHound gathers on a monthly basis, we will not only be aware of the weak points in our clients’ AD, but also can determine the significance of any anomalous behaviour on a host or with a user account. By knowing the role of a particular user account when we are analysing anomalous activity (for example, a user workstation regularly used by administrators), our SOC is able to take action quicker as well as providing our clients with a more detailed risk assessment of any observed anomalous behaviour.
This ensures the information we use to make the decision to raise an alarm with the customer or to take pre-agreed active response against anomalous behaviour is based on the true context around the affected user, the system they are on and its relative ‘risk distance’ from high value assets.
Setting up Bloodhound
Bloodhound consists of three major components:
- Sharphound ingestors that collect data from your AD. This is the tool the hacker or pen tester will use. It is used as either an executable or, as ‘in memory PowerShell script/module’, to gather data from the AD. It generates a JSON human readable text file. This is the file we ask you to upload to COPS. The longer it runs (typically we ask you it to run for 24 hours) the better the information we have about how the company domain is configured in and managed through AD.
- Neo4j database – This is the database where the JSON data is stored. The database is optimised to create linked node graph relationships for large datasets. This allows easy handling of large ADs. This is run in our secure facility and is only accessible to our SOC analysts and engineers.
- BloodHound is the graphical view used to query the Neo4J database. Again, this tool is only usable by our SOC analysts and engineers.
If you wish to gather data only, please see the section below regarding SharpHound Ingestors.
If you want to also run Bloodhound internally, then please also look at the sections on installing the Neo4J database and the install instructions for the BloodHound itself.
SharpHound Ingestors
SharpHound Ingestors are used to query the domain controllers and AD to retrieve all the trust relationships, group policy settings and AD objects and generate JSON files of this data. These files will populate the Neo4J database and then the snapshot of the AD can be viewed and queried using BloodHound.
Ingestors are the main data collectors for BloodHound. To function properly, BloodHound requires three key pieces of information from an AD environment:
- What user is logged on and where?
- Which users have admin rights and what do they have access to?
- What groups do users and groups belong to?
Additionally, BloodHound can also be fed information about which AD principles have control over other users and group objects to determine additional relationships. In most organisations, SharpHound will not require administrative privileges to run and can therefore act as a useful tool to identify paths to privilege escalate if run from a low privilege account.
Note that any changes to the AD after the ingestor has run will not be visible in BloodHound until the ingestor has run again.
There are two different ingestors: one written in C#, which is an executable, and a second one written in PowerShell which loads the C# binary via reflection into memory. See references at the end of the document to find the tool.
How to Use Sharphound
We ask you to run a Sharphound ingestor on an endpoint for at least 24 hours using a privileged account. On a domain-joined workstation or server (server preferred), to enumerate the domain’s AD, run either the PowerShell version or the C# binary. After a short while, use the keyboard shortcut Ctrl C to exit the gathering of data. A zipped-up set of JSON files is produced.
Note that antivirus may need to whitelist SharpHound for the duration of the time it takes to gather data. We recommend removing this whitelist as soon as the data has been gathered (the JSON files recovered).
The syntax for running a full collection on the AD is as follows. This will use all the collection methods in an attempt to enumerate as much of the AD as possible:
PowerShell -Exec Bypass
In PowerShell type the following:
Import-Module sharphound.ps1
invoke-Bloodhound -CollectionMethod All -Domain YOURDOMAINNAME -ZipFileName PATHTOZIP\file.zip -JsonFolder PATHTOZIP
The above command will run SharpHound, in PowerShell, to collect all information and export it to JSON format in a supplied path then compresses it for ease of import to BloodHound’s client.
An alternative way to download SharpHound and run it in one command is:
IEX (New-Object System.Net.Webclient).DownloadString(‘https://raw.githubusercontent.com/BloodHoundAD/BloodHound/master/Ingestors/SharpHound.ps1′); invoke-Bloodhound -CollectionMethod All -Domain YOURDOMAINNAME -ZipFileName PATHTOZIP\file.zip -JsonFolder PATHTOZIP
Send us the zip files via a COPS ticket or deploy the JSON file onto your own Neo4J/BloodHound instance by dragging the zip files onto the BloodHound application.
An overview of the most common collection methods is explained below. The CollectionMethod parameter will accept a comma-separated list of values. Default is the parameter if a method is not supplied:
- Default – This performs a collection of the local admins on machines, group memberships, domain trusts, and sessions
- Group – Collects the group memberships only
- LocalGroup – Collects just the local admins
- GPOLocalGroup – Performs local admin collection using Group Policy Objects
- ComputerOnly – Performs local admin collection and session collection
- Session – Collects the user sessions on machines on the domain
- LoggedOn – Performs privileged session collection (this requires local admin rights on target systems)
- Trusts – Enumerates the domain trusts for the specified target domain
- ACL – Collects the access control lists from the domain
- Container – Performs collection of Containers
- All – Performs all collection methods listed above.
Alternatively, if you want to run the binary, the same flags can be used, but instead of a single dash, use a double dash:
Sharphound.exe --ZipFileName PATHTOZIP\file.zip --JsonFolder PATHTOZIP\ --CollectionMethod All --Domain YOURDOMAINNAME
Running the Neo4J database and BloodHound
Following this section will enable your IT team to also see what your organisation’s AD allows. Run SharpHound to gather the JSON data as a zip file and drop it onto the BloodHound display which you will now set up as below.
Initial setup of BloodHound on your host system requires a few components. We’ll start with setup on Kali Linux, though it can be installed on Windows too (see further on). We recommend spinning up a dedicated Linux Virtual Machine that can be spun down when no longer needed.
Linux
BloodHound and its dependencies can be installed by a package manager if using Kali or another ‘Debian based’ operating system by running:
sudo apt install BloodHound
This will pull down all the required dependencies, including Neo4J and the NodeJS libraries. Once complete, run the neo4j console with the command:
sudo neo4j start
Set a new password for the user neo4j. Then run BloodHound:
sudo bloodhound
Set the database url to:
bolt://127.0.0.1:7687
and the user to ‘neo4j’ with the password set earlier.
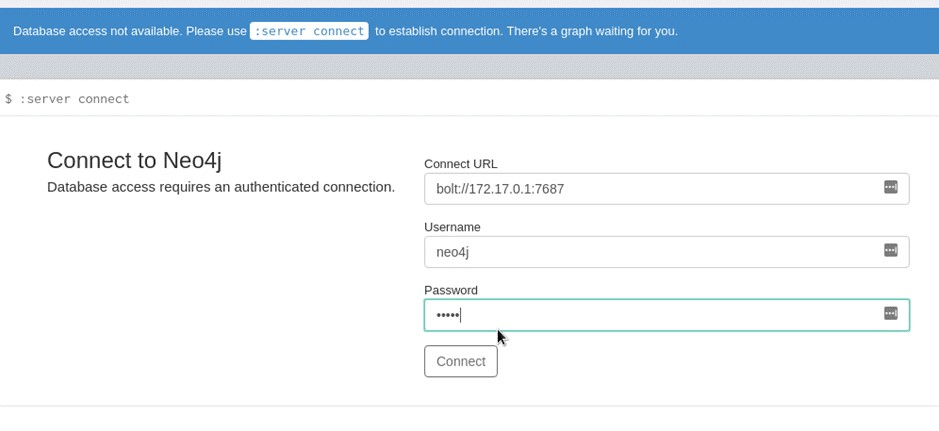
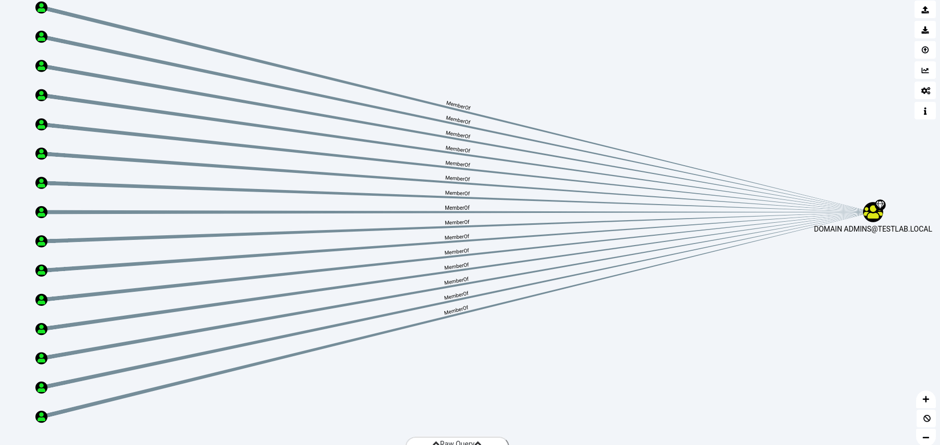
An empty graph should be displayed after a few seconds once ‘Connect’. Drag and drop the JSON file output from the SharpHound ingestor onto a running copy of BloodHound as a zip file, located in the folder set up in Sharphound’s settings. At this point a graph similar to the following will be displayed, detailing the domain administrators and the domain administrator group for the AD.
Windows
As with the Linux setup, download the repository from GitHub for BloodHound (see references at the end of this document). Setting up on Windows is similar to Linux, but there are extra steps required. We’ll start by installing neo4j on Windows. Neo4j can be acquired using sources listed in the references at the end of this document. Ensure you select ‘Neo4J Community Server’.
First, open an elevated PowerShell prompt and set the execution policy to allow execution.
Then navigate to the bin directory of the downloaded neo4j server and import the module and run it:
- Import-Module .\neo4j-management.psd1
- Invoke-Neo4j console
Once entering the default password, a change password prompt will appear for a new password. Make sure it’s something easy to remember as we’ll be using this to log into BloodHound.
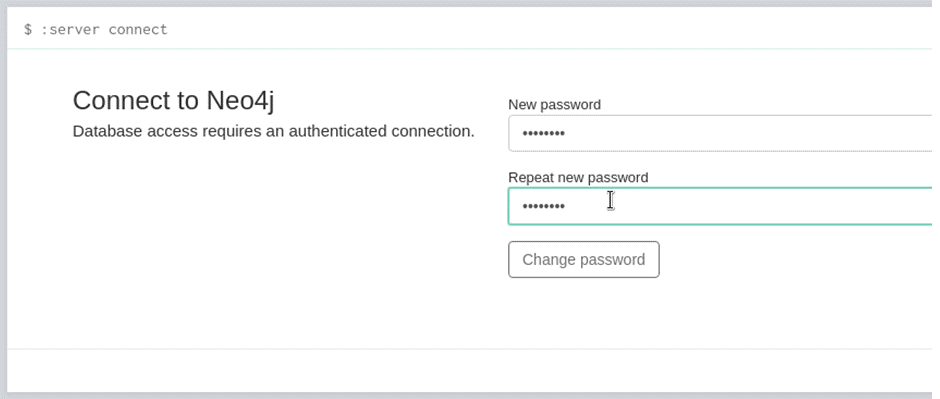
Note down the password and launch BloodHound from your docker container from earlier (it should still be open in the background) and log in with your newly created password:
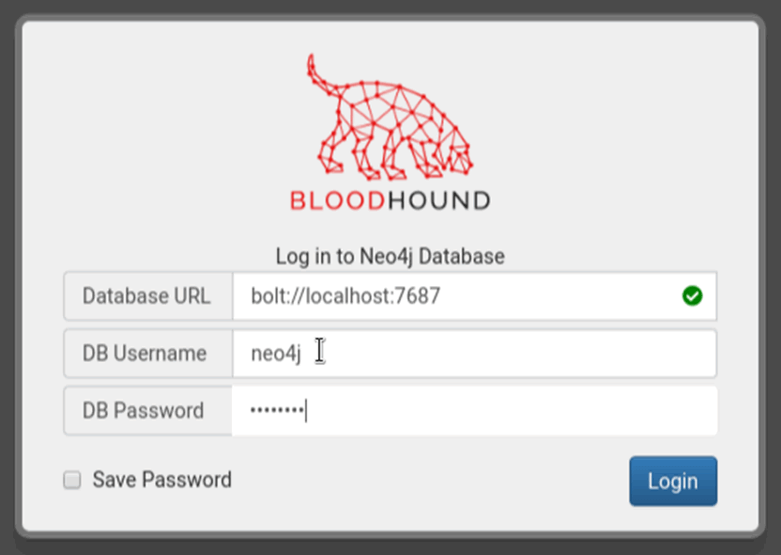
On authenticating BloodHound to the Neo4J server, an empty graph will be displayed. Drag and drop the output from the SharpHound ingestors onto the graph and wait while the AD data is uploaded onto the Neo4J database. Clicking on the three small bars on the top left will display the following:
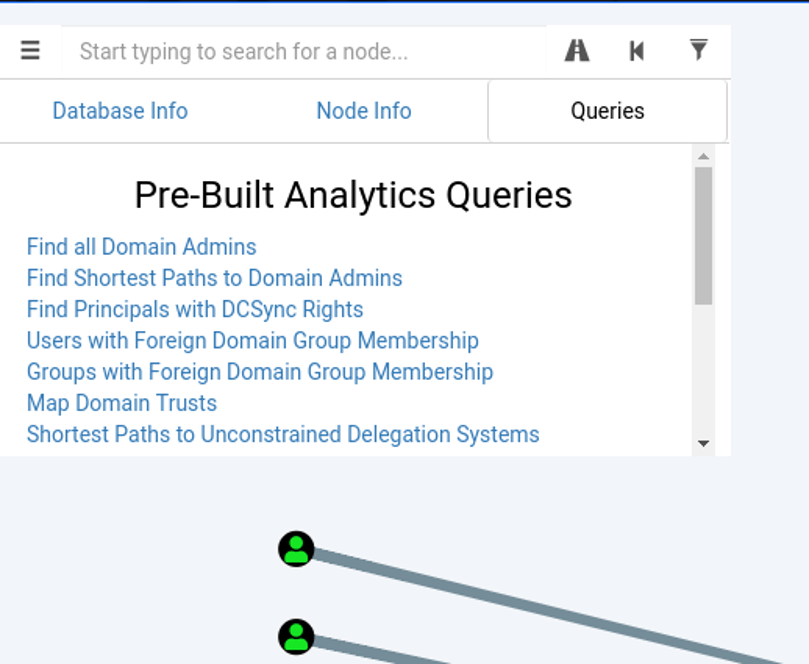
The graphical interface will display an image like the one below to show the members of the domain administrator group:
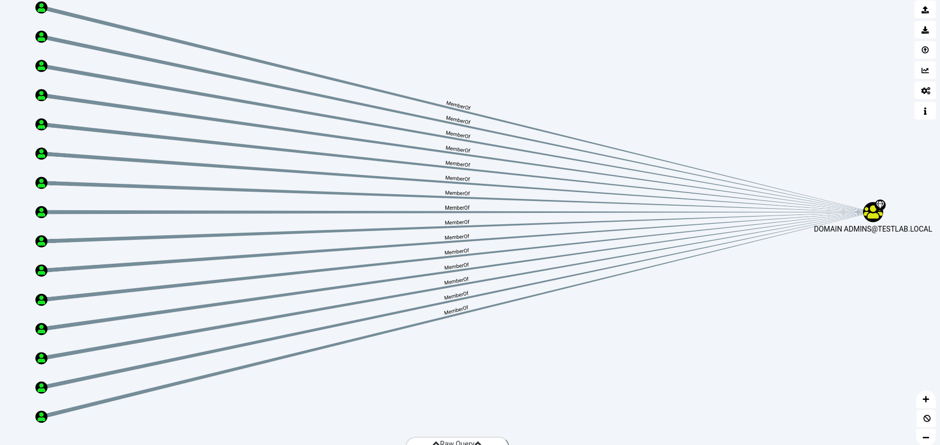
The view above shows all the members of the domain admins group in a simple path. In addition to the main graph, the Database Info tab in the left-hand corner shows all the statistics about the snapshot of the company that AD holds in the database.
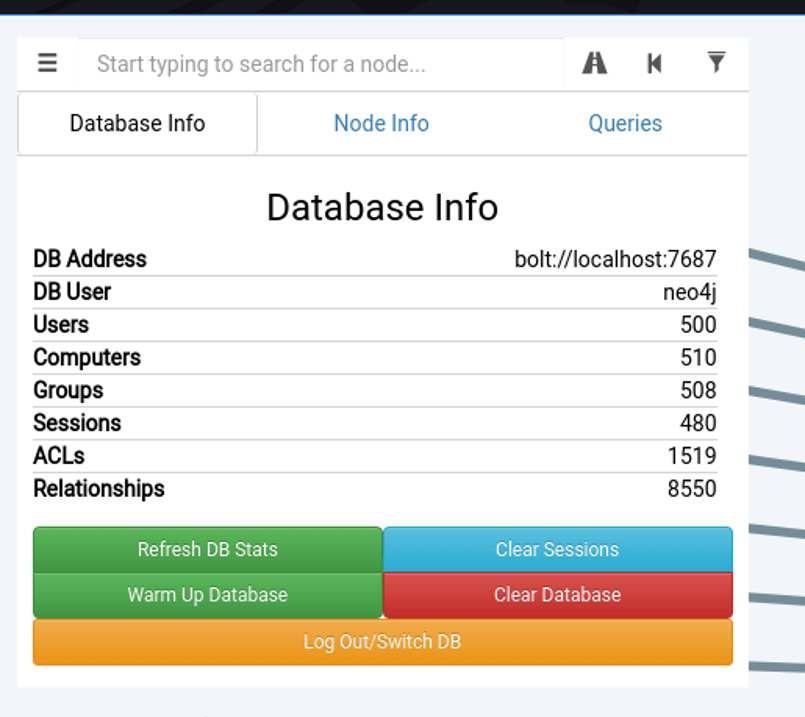
Explaining the different aspects of this tab is as follows:
- Users – The users on the network extracted from an AD
- Computers – The different endpoints on the network, servers, workstations and other devices
- Groups – The different AD groups extracted from AD
- Sessions – The amount of user sessions on computers on the network that the ingestor (Sharphound) has extracted (more on this later)
- ACLs – Access control lists, the different permissions and access that users and groups have against each other
- Relationships – The different relationships all the other aspects have with each other, such as group memberships, users, user sessions and other related information
References


